Inspiration: Nine Handmade Card Techniques
Today’s post features a project with nine handmade card techniques that you can use to show off your creativity. A while back, I created a swatch book out of 4″ tags and a book ring, with a collection of all my favorite techniques and alterations for paper crafting.
It really helps when you draw a blank trying to come up with a new project.
The Card
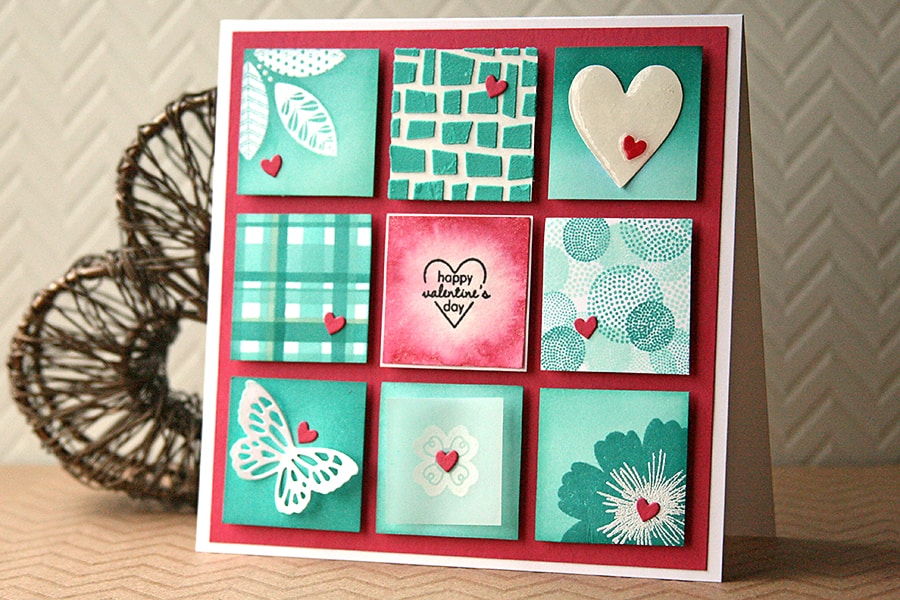
One of the challenges at Papertrey Ink was to make a card containing 9 squares with different techniques on each one. I used my swatch book to choose the ones I wanted – keeping simple since they were small squares -and also, I didn’t want to bombard you with a three-mile-long blog post.
The Techniques
Starting in the top left corner going across:
- Emboss Resist – Stamp your image on your paper with watermark ink, heat emboss with clear embossing powder. Next, blend ink over the design, then gently clean away any excess ink from the embossed area. Works equally well on patterned and solid color papers.
- Stenciled Embossing Paste – Tack down your paper, layer your stencil over the top and secure with removable adhesive. With a palette knife, gently smooth a thin layer of embossing paste over the stencil, like icing a cake. Gently lift the stencil and allow to dry. See this post on how to add color to your embossing paste.
- Ombré Inking – Blend your darker color down from one edge of your paper, and then blend the lighter shade up to meet near the center. Using a light hand with several layers creates the smoothest looking transition. The heart is die cut and coated with Glossy Accents for a glass-like finish.
The middle row, from the left:
- Masking – This plaid pattern is done with strips of masking paper and blending ink (three colors or more work best). Start at the top and mask off a stripe. Blend your ink over the exposed area, then peel up and move the tape down a little to mask the next area. Try using various widths or opposite directions.
- Watercolor – Wet your watercolor paper all over with clean water (not too much). Add dabs of paint around the edges, letting the water carry the pigment toward the center. Allow it to dry.
- Second Generation Stamping – After you ink up your stamp, gently stamp it on a piece of scratch paper before stamping on your project to create lighter, less intense shades of color. Great for adding depth and making custom patterns and backgrounds.
Bottom row, from the left:
- Die Cut Embellishments – Using a die cutting machine like a Big Shot, or an electronic version such as a Silhouette CAMEO, cut your embellishment and adhere to your project. Die cuts can even be altered by ink or mixed media before adding them.
- Stamping Under Vellum – Stamp your image on vellum (opaque colors and pigment inks work best) and allow to dry. Flip vellum over and adhere to your project. You can hide your adhesive with strategically placed embellishments 🙂
- Layered Stamping – There are sets you can buy that make layered images super easy like the one used. Create your background with your lightest ink, stamp your first image layer in a darker color, then use your darkest color from your last layer. Alternatively, you can add a lighter color to the final layers by heat embossing with colored powders.
After I created all my pieces, I arranged them on a 5.5″ x 5.5″ card with foam squares.
Thanks for stopping in to see my nine handmade card techniques in one lovely card – what’s your favorite method? Leave a comment below and let me know!
